

Photo courtesy of University Movers
It’s that time of year! Leases are turning over all throughout Manhattan and moving trucks abound. Whether it’s from one apartment to another, from an apartment to a new house in the ‘burbs, or one house to another, moving can be stressful. You can have all of the grand visions in the world of making it romantic (candle-lit pizza dinner on the empty living room floor?) but inevitably, the logistics of the move are going to get in the way and stress takes over.
For those of you who are open to it, this is the PERFECT time to hire a Professional Organizer, many of whom specialize in relocation and moving. But for those of you who want to do it on your own, here are my best tips for staying organized while moving:
1. PREPARE
Depending on the amount of “stuff” you have, make sure you start working far enough in advance of your move that you can handle a little bit every day, and not rush towards the end to pack.
2. TRASH AND DONATE
The goal is to go through all of your things prior to moving and trash or donate what you don't want. This will mean that you don’t spend time and money to pack, move and unpack items that you don’t really need. In reference to Tip 1, it is important that you start ahead of time, because there is often a limit to how much trash you can provide at one time, both in apartment buildings and curbside at your suburban house. Do the research before-hand to find out if there are restrictions. Talk to your building management, talk to neighbors, research online, call your town – just make sure you know. If you DO find yourself in a pickle with more trash than you are allowed to get rid of, never under estimate the power of a good tip to the people who handle your trash. Otherwise, make an appointment with a junk lugging company, but keep in mind, it will cost you! Similarly, charities that perform donation pickups often have a waiting list and may not be able to give you an appointment for a few weeks, so keep that in mind when you call to schedule.
3. HAVE THE RIGHT SUPPLIES
The basics are:

Photo courtesy of EZBins
- Moving boxes – A variety of sizes are recommended. Boxes can be expensive, so you can use resources like Freecycle and Craigslist to get used boxes. For those of you in Manhattan, you can use my favorite resource, EZBins. Ez-bins provides you with plastic moving containers, delivered right to your door, and picked up empty from your new place. At less than $5 per box, these eco-friendly boxes save you the time of shopping for boxes and tape, and save you money as well.
- Packing tape – Get one dispenser and large packages of refill tapes for the most economical solution. Use this to build boxes and seal them up once filled. Also important to wrap items with below packing materials. This item isn’t needed if you use EZ-Bins.
- Packing paper – I prefer clean, solid newsprint. Old newspapers are the most economical choice, but beware that ink can transfer onto the items around which the newspaper is wrapped. Packing paper is perfect for items whose surfaces need protection from scratching and dirt, but aren’t very fragile. Example: pots and pans.
- Packing foam – Great when you need layers of protection in between items without using a lot of space. For example: Layer in between plates and bowls.
- Bubble wrap – Use for really delicate items. Example: crystal stemware, perfume bottles, bottles of wine and liquor.
- Markers – So you can label, label, label!
- Color coding labels – Perfect for color coding your boxes. Remember to label your master list as well, and for extra clarity, stick a colored dot on the door-frame of the appropriate room in your new house to help the movers know where to place the boxes.
- Pad of paper for inventory lists – See below on the importance of inventory lists.
4. KNOW BEFORE YOU PACK
There ARE best practices in packing. Here are some tips:
- Don’t place too many very heavy items in one large box. Using smaller boxes for heavy items makes them easier to transport.
- Always ensure sharp edges, like knife blades, are properly wrapped for protection.
- Stack plates horizontally (like filed papers), they are less likely to break this way.
- Use household items as packing paper when possible. Kitchen towels are great for wrapping around bowls.
- Use small zip lock bags for small items so they don’t get lost as you move. This is especially important for screws and other small construction parts for furniture that has to be disassembled for the move. Put those parts for each piece of furniture in a labeled Ziploc bag and keep it on your person when you move. Then you can hand those bags back out in your new home to whoever is reassembling the pieces of furniture.
5. PACK BY ROOM
Ensure items to be placed into the same room in your new home are packed together. This will make your life much easier when you are unpacking. Label boxes with the name of the room where they should be unpacked, (labeling conventions below) so they can be delivered right there.
6. LABEL YOUR BOXES
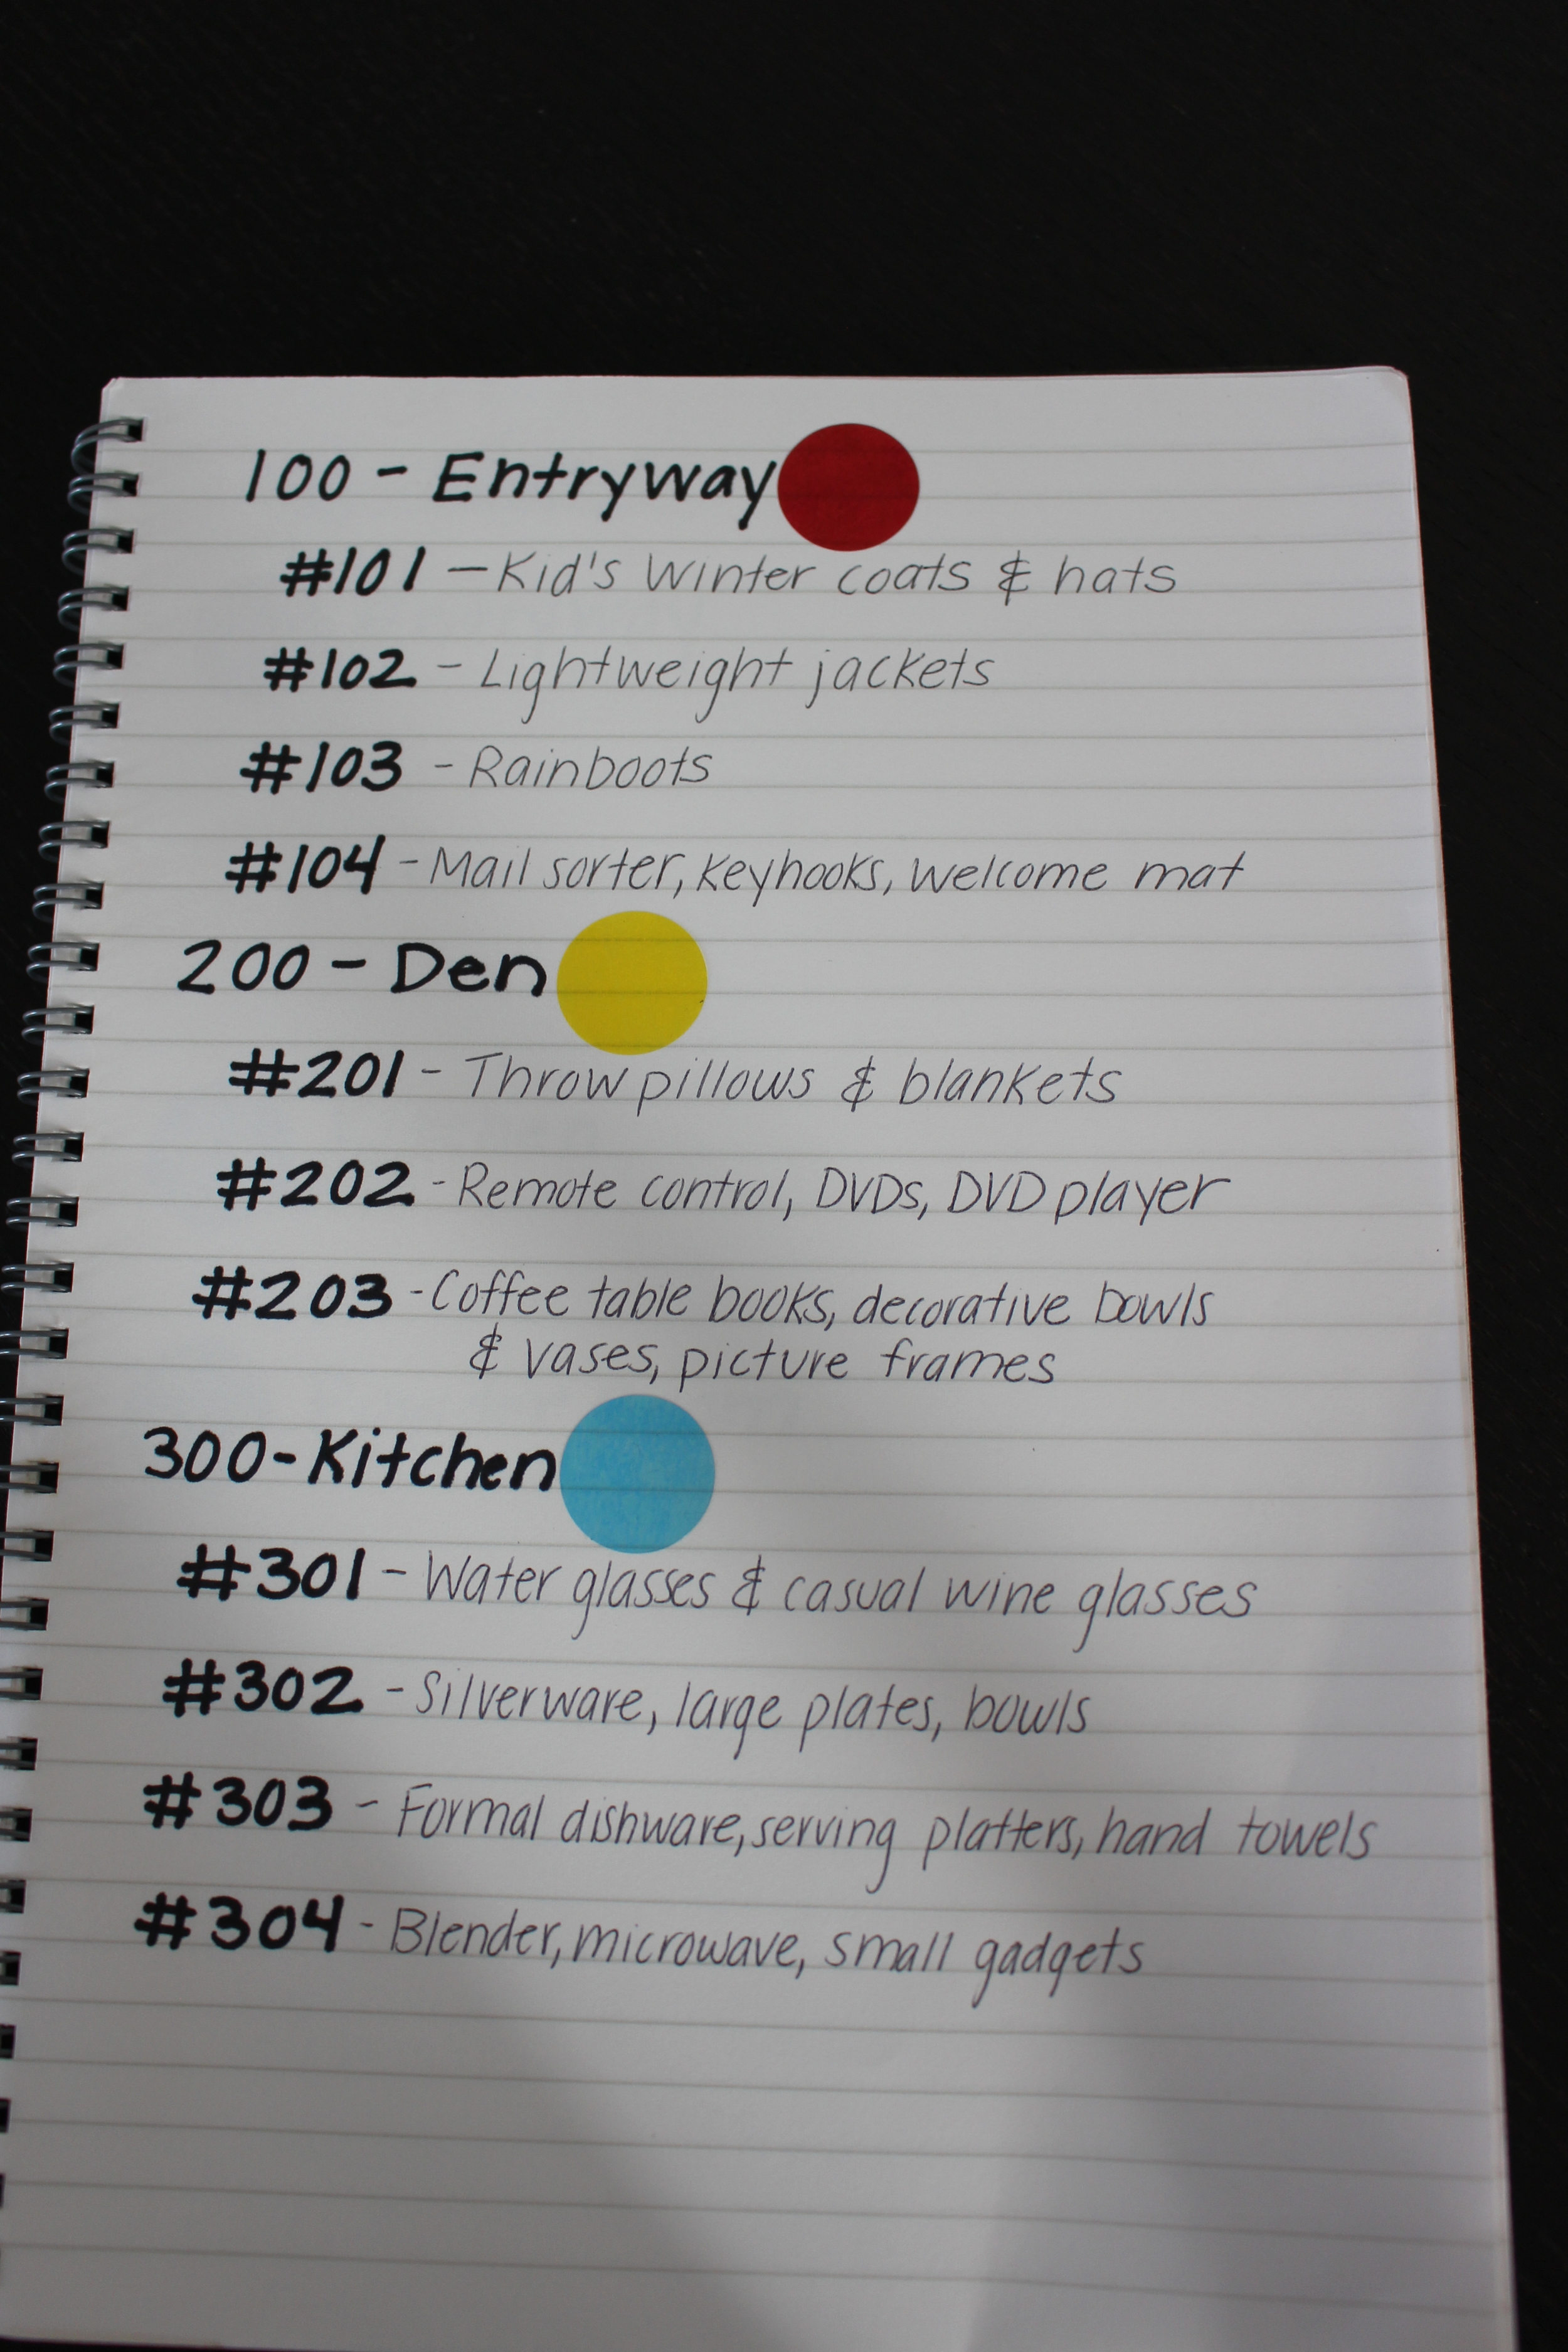
Right away. Before you seal them up. Trust me on this. Label them broadly by room (“kitchen”, “master bedroom”, “Den”) and then list an overview of contents. Some people recommend color-coding by room, some find it much easier to label each room by number. There’s no harm in using both methods. Here’s a list using both methods.
7. CREATE A MASTER LIST

TWICE. As you pack, create a master list of your boxes and their contents and create a key to help you identify how you are labeling your boxes. Then, make a copy of your master list. One copy may get lost in the shuffle of the move, so having a backup copy is always recommended. You can manually write it, photocopy it, or take a picture on your phone to keep it digitally.
8. KEEP IMPORTANT ITEMS WITH YOU
Whenevever possible, keep important items on your person. While your moving company will be insured and most are trustworthy, there are just some items that are too valuable to risk putting in boxes and sending off with someone else. These include:
- Valuable papers like birth certificates, passports and current financials
- Money and credit cards
- Valuable jewelry
- Prescription medication
9. CREATE A MOVING KIT
My final piece of advice is to create a moving kit for yourself. This will vary depending on the number and type of people included in your move , as well as where you are moving to and how many days it will take you to travel. No matter the details of your move, your move kit should include items that you will need access to immediately upon arriving at your new home, if you won’t have immediate access to purchase them. For example, a client recently moved from a home in one suburb across state lines to another home. We sent the moving truck off, and then they drove to meet the moving truck at their new home early morning 2 days later. The closest drugstore and supermarket were a 10-minute drive from their new home. For them, we packed the following:
- Two days and nights worth of clothing and toiletries for travel and move-in day. Pack like you are going on a weekend trip.
- 2 rolls of toilet paper and 2 bottles of inexpensive hand soap
- 1 roll of paper towels, windex and general household cleaner
- Snacks: pre-washed apples, pretzels, bottles of water, energy bars
- 1 packet each of plastic plates, cups and utensils
- 1 box of large garbage bags
At the end of the day, preparedness and organization are the key to any successful move! Hopefully these tips will help you during your next move! What are your personal moving tips?